Thursday, 28 February 2019

How to Block a Number on iPhone


Unwanted calls can be really annoying, regardless of whether they are from telemarketers, accident helplines, PPI claim providers, or a friend you had a falling out with. Fortunately, you can block numbers on iPhone and stop unwanted calls altogether. Blocked users won't be able to call you.


Part 1: How to Block a Number on iPhone


Part 2: How to Erase Deleted Contacts

Sponsor ads:How to Create Boomerang from Existing Videos on Android/iPhone 2019

Sponsor ads:How to Download Songs from Spotify with 4 Best Spotify Music Downloadeders 2019


Part 3: Tip about Spam Calls
How to Block a Number on iPhone

Following are two ways to learn how to block a number on iPhone:
1. Via Settings

You can easily block numbers on iPhone via the Settings app. Follow these instructions:

Step 1: Open Settings on your iPhone.

Step 2: Navigate to Phone > Calls > Call Blocking & Identification section of the settings. A list of contacts and phone numbers that you have previously blocked will appears.

Step 3: Now find and select Block Contact.

Step 4: Browse contacts and select the one that you wish to block. Once the number is added, it will no longer be able to reach you via calls, Messages, or FaceTime.

Step 5: Now repeat the above two steps to add as many contacts as you want in order to block them.


2. Via Phone App

You can also use the Phone app to block numbers on iPhone that you don’t want to receive calls from. Follow these instructions:

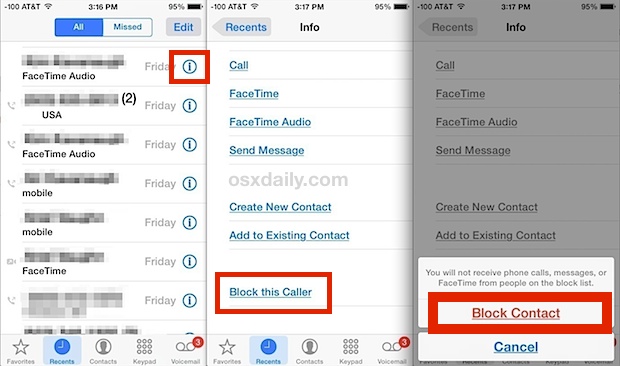
Step 1: Open Phone app on your iPhone and navigate to the ‘Recents’ section.

Step 2: Find and select the number you wish to block and tap ⓘ next to that number.

Step 3: Now find and select the option ‘Block this Caller’ and then tap ‘Block Contact’ when prompted. The number will now be blocked.

Step 4: Repeat these steps to block as many contacts as you like.


How to Erase Deleted Contacts

After knowing how to block a number on iPhone, you may also wonder how to erase the deleted contacts. iMyFone Umate Pro for Win or for Mac is a third-party iPhone data erasing tool that is capable of deleting various types of iPhone data permanently and making it unrecoverable. You can permanently erase blocked contacts via this software. Some of the other features Umate Pro offers include erase all iPhone data with a single click, erase deleted files, bulk uninstall apps, clean up junk files to boost iPhone’s performance, etc.Sponsor ads:

Gihosoft Free iPhone Data Recovery:https://www.gihosoft.com/iphone-data-recovery-free.html

Gihosoft iPhone Data Recovery Free

Free iPhone Data Recovery Software for Windows/Mac

Recover up to 12+ types of files, including contacts, SMS, photos, WhatsApp, Viber, notes, etc.

Restore lost data from iOS devices directly or from iTunes and iCloud backup

Recover iPhone data lost due to iOS upgrade/jailbreak, accidental deletion, device lost or broken

Support all the latest iPhone, iPad and iPod Touch

Both Free and Pro version.

If you lost data after you updated to a new iPhone, you can always use Gihosoft iPhone Data Recovery to get the data back from the old iPhone or backup.You may also like: iphonerecovery.com

If you use android phones, please choose Gihosoft Android Data Recovery.

With Gihosoft Android Data Recovery, no longer afraid of data loss!

Must read:Youtube video downloader for pc

Gihosoft RePicvid Free Photo Recovery Software provides a free photo recovery software for windows to help users recover the deleted or lost photo for free.

Jihosoft Android Data Recovery: the best Android Data Recovery software for Windows and Mac to recover deleted contacts, messages, photos, videos, WhatsApp and etc from Android devices.Tips:How to transfer messages from iPhone to iPhone

jihosoft Free iPhone Data Recovery

Solutions for iTunes Can’t Verify the Identity of the Server


Solutions for iTunes Can’t Verify the Identity of the Server 2019

Following are some other solutions you can try to fix iTunes can’t verify the identity of the server:
a. Clear iTunes Cache

Clearing iTunes cache is a simple fix that might solve the problem. The process is pretty straightforward and won’t take more than a minute. Follow these instructions:

Step 1: Open iTunes

Step 2: Navigate to Preferences > Advanced

Step 3: Now find and click Reset Cache option

Step 4: Click OK to close the window


b. Update/Downgrade iTunes

If you did not update iTunes and the “iTunes can’t verify the identity of the server” issue occurs randomly (you can open iTunes most of the time), then it is recommended that you update iTunes to the latest version. You can either update from iTunes itself or simply uninstall the current version and then download the latest version from Apple’s official website and install it.

If the problem occurred after updating iTunes, then it is recommended that you uninstall it and then install the previous version (downgrade).
c. Tweak iTunes Automatic Update Checking

This is another simple fix. It may or may not solve your issue, but it is worth a try. Follow these instructions:

Step 1: Open iTunes

Step 2: Navigate to Preference and untick the option ‘Check for updates automatically’

Step 3: Now tick the option again

Step 4: Restart iTunes


d. Keychain Access

This is a relatively lengthy and complex process but some users have successfully managed to solve the problem with it. Follow these instructions:

Sponsor ads:How to Create Boomerang from Existing Videos on Android/iPhone 2019

Sponsor ads:How to Download Songs from Spotify with 4 Best Spotify Music Downloadeders 2019


Step 1: Close App Store and iTunes

Step 2: Open Keychain Access by navigating to Finder > Applications > Utilities

Step 3: Under Keychains, navigate to System Roots > Category > Certificates

Step 4: Now find the certificates that show a blue dot and a plus sign and then perform the following step in each of them:

Step 5: Open the certificate and click on the triangle. It will be shown next to ‘Trust’

Step 6: Choose ‘no value specified’ option in ‘Secure Sockets Layer (SSL)’

Step 7: Close the certificate and then open it again.

Step 8: Now choose ‘Use System Defaults’ in ‘When using this certificate’ option and then close the certificate. The plus sign and blue dot will disappear.

Step 9: Close the Keychain Access. The problem should be solved now.


The Main Causes of the iTunes Can’t Verify the Identity of the Server

Following are some main causes of the problem:


This issue may occur if the server iTunes is trying to connect is not the official server.


The host file of Windows is blocking iTunes from connecting to the internet. Some workplaces do this by putting internal resources in the hosts file.


The problem may also occur due to insecure HTTP requests being sent from iTunes to Apple, even if you have already patched your Windows’ HOSTS file.


Windows Firewall or some other third-party software is blocking internet access of iTunes.


There is a problem with Windows proxy server settings.
You may also like:Sponsor ads:

Gihosoft Free iPhone Data Recovery:https://www.gihosoft.com/iphone-data-recovery-free.html

Gihosoft iPhone Data Recovery Free

Free iPhone Data Recovery Software for Windows/Mac

Recover up to 12+ types of files, including contacts, SMS, photos, WhatsApp, Viber, notes, etc.

Restore lost data from iOS devices directly or from iTunes and iCloud backup

Recover iPhone data lost due to iOS upgrade/jailbreak, accidental deletion, device lost or broken

Support all the latest iPhone, iPad and iPod Touch

Both Free and Pro version.

If you lost data after you updated to a new iPhone, you can always use Gihosoft iPhone Data Recovery to get the data back from the old iPhone or backup.You may also like: iphonerecovery.com

If you use android phones, please choose Gihosoft Android Data Recovery.

With Gihosoft Android Data Recovery, no longer afraid of data loss!

Must read:Youtube video downloader for pc

Gihosoft RePicvid Free Photo Recovery Software provides a free photo recovery software for windows to help users recover the deleted or lost photo for free.

Jihosoft Android Data Recovery: the best Android Data Recovery software for Windows and Mac to recover deleted contacts, messages, photos, videos, WhatsApp and etc from Android devices.Tips:How to transfer messages from iPhone to iPhone

jihosoft Free iPhone Data Recovery

Wednesday, 20 February 2019

How to Fix iPhone Calendar Not Syncing 2019


1 Reset Your iPhone Calendar by Settings

Do you know that you have the helpful Setting option to reset your iPhone calendar? If your calendar making errors and doesn't sync all events, then follow these steps to reset settings.


Step 1: Go to "Settings" in iPhone menu.


Step 2: Select the section of "Calendars".


Step 3: Now click on "Sync".


Step 4: After the click, checkmark on "All Events". So you will not lose any event.


Step 3: Just wait a while to check all your finally synchronized events in calendars.

Please be noted that iCloud has its own time schedule to update events and updates. So it depends that how long you will receive your events notifications.


2 Re-Turn on Your iCloud Calendar

This method is referred to iCloud settings. Because iCloud stop working or hung up sometimes, so you need to refresh the app to get up-to-date assistance again. Refer to bellow steps for the full guide.


Step 1: Go to Setting in iPhone, and then select your device by your click on the device name.


Step 2: Now choose iCloud.


Step 3: Slide screen to turn off all apps like contacts, Calendars, and reminders.


Step 4: Now you need to delete calendars, contacts, and reminders by deleting your device from iCloud.com. If it is visible on iCloud.com then choose to keep all on your device.


Step 5: After some minutes, turn on back all apps like contacts, calendars, and reminders.

This process will refresh you all apps and you can set your required setting again.


3 Fix Gmail Calendar Not Syncing on iPhone

Google is getting the above rank to get hold of all apps. So, this method refers to Gmail account to operate your calendar events and reminders. Just follow these simple steps.


Step 1: Go to Setting in iPhone and then select Contacts, Calendars, and reminders.


Step 2: choose the Gmail account. Make sure that "Switch for Calendars" option is On.


Step 3: Now only go to Calendars section.


Step 4: Click on "Sync", select all Events.


Step 5: Click on "Default Calendar".


Step 6: Now choose "Gmail Calendar" as your default.

By adding Gmail in your Calendar activities, you will be always synchronized with your events.

These above three methods guide you to sync calendar events and reminders. But to save and store the iPhone data, you can transfer your calendar events to computer as well. This will be arranging your memos for the long term in your computer. This action will work as reminders itself. But what do you need to do this? Definitely, you need a transfer tool for your calendar to save data that may not sync to iPhone. Here, we are introducing a new tool for iDevices.


4 Save iPhone Calendar to Computer Regularly (iOS 12 Supported)Sponsor ads:

Gihosoft Free iPhone Data Recovery:https://www.gihosoft.com/iphone-data-recovery-free.html

Gihosoft iPhone Data Recovery Free

Free iPhone Data Recovery Software for Windows/Mac

Recover up to 12+ types of files, including contacts, SMS, photos, WhatsApp, Viber, notes, etc.

Restore lost data from iOS devices directly or from iTunes and iCloud backup

Recover iPhone data lost due to iOS upgrade/jailbreak, accidental deletion, device lost or broken

Support all the latest iPhone, iPad and iPod Touch

Both Free and Pro version.

If you lost data after you updated to a new iPhone, you can always use Gihosoft iPhone Data Recovery to get the data back from the old iPhone or backup.You may also like: iphonerecovery.com

If you use android phones, please choose Gihosoft Android Data Recovery.

With Gihosoft Android Data Recovery, no longer afraid of data loss!

Must read:Youtube video downloader for pc

Gihosoft RePicvid Free Photo Recovery Software provides a free photo recovery software for windows to help users recover the deleted or lost photo for free.

Jihosoft Android Data Recovery: the best Android Data Recovery software for Windows and Mac to recover deleted contacts, messages, photos, videos, WhatsApp and etc from Android devices.Tips:How to transfer messages from iPhone to iPhone

jihosoft Free iPhone Data Recovery

How to Bypass iPhone Passcode without Computer

There are situations when the users need to bypass their password in order to operate their iPhone. Here are of the common ones: Forgot your...